Control a Ragdoll Together Limb & Party Tier Lists
Rank roles by obstacle type, worlds by difficulty, and team sizes by reliability.
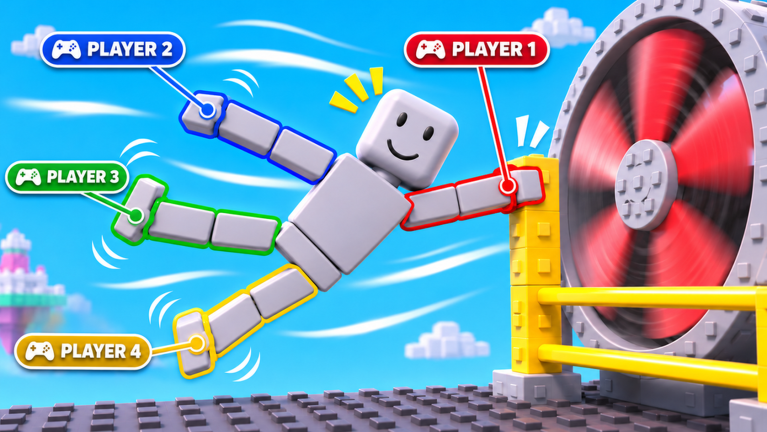
A traditional unit tier list does not fit Control a Ragdoll Together. Nobody unlocks a rarer character mid-run—you assign limbs on one shared puppet and climb eight worlds together. This hub ranks what actually matters: which limb roles carry different obstacles, how hard each world feels, and which party sizes clear content most consistently. Pair these rankings with controls and co-op tips before you rearrange seats mid-lobby.
Tiers below reflect early-live play after the 3 November 2026 launch. Patches can nudge timings, so revisit after reading the updates hub.
Limb role tiers by obstacle type
Roles assume a full four-player stack (left arm, right arm, left leg, right leg) with light torso/head influence when the game exposes it. Solo and duo players should read the notes as “priority inputs,” not as empty seats.
Monkey bars — Arm S-tier
- S: Left Arm / Right Arm — grip timing and release windows live here.
- A: Opposite arm support — keeps the body square so you do not twist off the rung.
- B: Legs — mostly stabilize landing after the dismount.
- C: Head/Torso lean — useful only for tiny angle corrections.
Rock walls — Mixed A/S
- S: Arms for holds, Legs for push timing when a foothold appears.
- A: Synced opposite limbs so the puppet does not peel sideways.
- B: Torso square-up between moves.
Spikes and narrow walks — Legs S-tier
- S: Left Leg / Right Leg — cadence and micro pauses decide survival.
- A: Arms for balance poles or overhead braces when present.
- B: Head look direction to spot the safe tile early.
Hammers and moving crushers — Timing A for everyone
- S: The limb that initiates the dash or hop through the gap (often a lead leg).
- A: Trailing limbs that must not flinch early.
- B: Decorative wiggles—any panic input can count as “whose fault.”
Falling meteors — Eyes up, legs ready
- S: Legs for lateral dodge bursts.
- A: Arms if a meteor breaks a bridge and you must grab a ledge.
- B: Idle limbs—hold still unless called.
Overall limb priority (general clear)
| Tier | Role | Why |
|---|---|---|
| S | Arms (either) | Climbing and bars gate many mid-game rooms |
| A | Legs (either) | Spikes, landings, meteor strafes |
| B | Lead communicator (any seat) | Callouts prevent blame spirals |
| C | Silent passenger | Fine in easy Plains rooms, costly later |
If your stack has a weak communicator, put your clearest caller on an arm seat during bar-heavy chapters so movement and shots are the same voice. Details live in co-op tips.
World difficulty tiers
Worlds climb from tutorial warmth to Ember Core chaos. Exact names may display slightly differently in-client, but the published arc runs Plains → … → Ember Core across eight stages.
| Tier | Worlds (approx. order) | Expect |
|---|---|---|
| D | Early Plains rooms | Wide checkpoints, forgiving timings |
| C | Mid Plains / first wilds | Introduce bars and light spikes |
| B | Mid campaign | Rock walls plus hammer rhythms |
| A | Late campaign | Mixed hazards, tighter blame windows |
| S | Ember Core approach & finale | Meteors, stacked traps, less panic room |
Treat Ember Core as the skill check that separates a laughing duo from a practiced four-stack. Checkpoint discipline matters more than raw rank—see the worlds walkthrough.
Team size tiers
| Tier | Size | Best for | Weakness |
|---|---|---|---|
| S | Duo (2) | Clear voice, fast retries, easy blame talks | Each player covers more limbs |
| A | Trio (3) | Strong coverage without full lobby noise | One silent seat still hurts |
| A | Full 4 | Maximum specialization per limb | Needs disciplined callouts; no Voice Chat in-game |
| B | Solo | Practice, learning layouts | High cognitive load; late worlds punish |
S-tier recommendation for most friends groups: start as a duo, clear through mid worlds, then invite a third only when bars and walls demand dedicated arms. Full fours shine when everyone already knows the obstacle guide patterns.
Solo is absolutely valid—the game supports it—but expect longer reset loops when one brain must fake a whole team’s timing. The players hub expands hosting and composition advice.
How to use this list in lobby
- Ask who has bar experience; seat them on arms.
- Put calm players on legs for spike halls.
- Agree on a single “go” caller before hammers.
- After any blame popup, adjust the tier seating instead of swapping randomly.
- Re-read Getting Started if someone is brand new so they know checkpoints before Ember Core pride runs.
Rankings are tools, not insults. A “C-tier silent passenger” becomes S-tier the moment they learn to wait for the call.
Frequently Asked Questions
Quick answers to the most common questions.
What is ranked on this tier list?
Limb roles by obstacle type, the eight-world difficulty curve toward Ember Core, and party sizes from solo to full four-player stacks.
Is a four-player team always best?
Not always. Duos often clear faster with cleaner callouts. Fours win when each limb has a specialist and communication stays strict.
Which limb should beginners take?
A trailing leg on early Plains rooms is forgiving. Move to an arm seat once monkey bars appear and you understand release timing.
Does solo play have a tier?
Yes—solo sits in B for efficiency. It is great for learning layouts but harder on late mixed-hazard worlds.
Will updates change these tiers?
They can. Hazard retunes may shift arm vs leg priority. Check the updates hub after patches and adjust seating.